Roast and Toast

Hey guys. What’s that? Where have I been for almost 10 months? Wrapping up my 20’s, that’s what. And this weekend we hosted a “Roast & Toast to 30” party to celebrate me and my cousin, Ellis, turning 30. We roasted 400 Eastern Shore oysters , toasted marshmallows and, of course, raised a few glasses.

Processed with VSCOcam with c1 preset

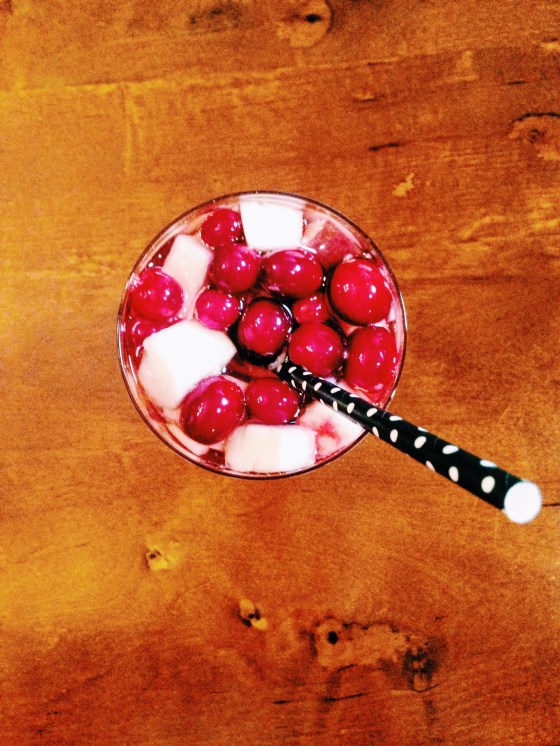
A crowd favorite of the evening was an Apple Cranberry Sangria I had dreamed up that was festive, but refreshing; sweet but not sugary. Everyone kept asking for the recipe, but as usual I didn’t have one – I just sort of thought of it and mixed it up with what felt right. However, I think I can reverse engineer it enough to give you an idea so that you can mix it up for your next festive feast or casual get together (or Sunday afternoon).

Apple Cranberry Sangria

Processed with VSCOcam with c1 preset


Ingredients:

  • 1 bag of fresh cranberries
  • two fresh apples (we used Fuji)
  • 1 bottle of Dr. McGillicuddy’s apple liqueur
  • 1 liter Ginger Ale
  • 1.5 liter bottle of pinot grigio
  • 1 large bottle of cranberry juice

Method:

  1. A few days ahead of time, put the bag of cranberries in the freezer and chill the wine, juice and ginger ale.
  2. A few hours before you want to drink the sangria, mix it up in a large decanter (I have a big one I use for parties that has a spigot – it’s great. Every consummate hostess should have one). Cut the apples into rounds and put in first, then top with the frozen cranberries. After you’ve put in the fruit – no matter what size container you’re using – whether it’s a large pitcher or a decanter – fill it up with about 2/3 of the way with equal parts wine and liqueur, then top it off with equal parts ginger ale and cranberry juice.
  3. Mix well and let sit in the fridge until ready to serve. Then serve in glasses filled with ice and/or garnished with more apples and cranberries.

I hope you all enjoy this fun, fruity drink with your friends and family this holiday season.

Protein Packed Chia Acorns

I do a lot of working out and a lot of lifting weights, and when you do that, you have to give your body protein when you’re done or else you’ll actually burn muscle instead of fat. Most of the time after I workout, I have a Juice Plus shake or smoothie, but sometimes I just want a quick little snack. I’ve also been researching and eating more chia seeds lately, in smoothies, juices, baking, etc.

Chia (yes, the same chia that is subjected to clay likenesses of Duck Dynasty characters’ live beards) is a tiny, edible seed that is derived from the desert plant Salvia hispanica. It grows in Mexico and is dated back to the Mayan and Aztec cultures who ate the tiny black or white seeds as an energy booster. Today, people eat them for the same reason and many others that we now know. The seeds are packed with Omega-3 fatty acids, protein, fiber, antioxidants and even calcium. Unlike flax seeds, chia seeds are a whole grain food that can be absorbed by the body in its seed form (flaxseeds can only be absorbed if ground – otherwise they pass through your system untouched). One ounce (about 2 tablespoons) contains 139 calories, 4 grams of protein, 9 grams fat, 12 grams carbohydrates and 11 grams of fiber, plus vitamins and minerals.

So it’s a great item to add into your diet whenever possible since they are so nutrient dense. There are also claims that because of their high fiber content, they can help you stay fuller for longer, and so for some people, perhaps, help them to lose weight. That’s a harder claim to prove, but it’s there.

So yesterday, after my workout, I decided to create a protein-rich post-workout snack that’s also just a tiny bit indulgent. You can find chia seeds at your local health food store and nowadays probably in your grocery store’s organic or health section. White or black chia are fine – I’m not aware of any particular taste difference, although there may be some. The chia doesn’t really affect the taste all that much in this recipe.

Protein Packed Chia Acorns

chia acorns

Ingredients:

  • 5 Medjool dates, pitted (yes, they have pits as my food processor discovered for me!)
  • 4 tbs of organic, low-sugar or no sugar peanut butter or other nut butter including almond, cashew – even tahini (sesame seed butter). PB can be creamy or crunchy.
  • 2 tsp chia seeds, ground (I grind flax and chia in my coffee grinder)
  • 1 scoop of Juice Plus chocolate shake mix or any other protein powder – I prefer chocolate flavored, but vanilla or unflavored is also OK. 1 scoop of Juice Plus is 38 grams – usually protein powders are measured by weight, not volume….soooo, you’re just going to have to sort of estimate there. I’d say the scooper that comes with it is around 1/4 cup?
  • 1/4 cup of dark chocolate chips or pieces
  • 1 tsp vegan butter (or real butter, if you’re lucky enough to have a body that can process dairy)

Method:

  1. Process the dates, nut butter, chia seeds and protein powder in a food processor until crumbly and mixed well.
  2. Using a cookie scoop, scoop out 10-12 balls and roll in your hands until they’re round and packed firmly. Place on a parchment lined baking sheet.
  3. Microwave the chocolate and vegan butter in a heat proof glass dish for about a minute, on low, stirring with a silicon spatula about halfway through. If not completely melted after one minute, microwave for 10 second increments, checking each time to see if the chocolate is smooth.
  4. Once smooth, dip each ball halfway into the chocolate (or use a small spatula to spread the chocolate onto the protein balls) and place back onto the parchment.
  5. Freeze for half an hour, then put into an airtight container and store in the refrigerator.

chia acorns bitten

These are really yummy, just a little indulgent, and packed with protein. However, I think if I make them again, I might try a different method. I was thinking it might be easier to take the processed mixture, pack it into a parchment lined brownie pan, melt the chocolate, then spread the chocolate over the top of the mixture, freeze, then cut into squares and wrap individually in the fridge. Probably not as cute as these little acorns, but maybe a tiny bit easier to make and store?

Anyways, give chia a chance. It’s not just for white elephant gift exchanges anymore.

Snow Day Soup

If you live pretty much anywhere on the east coast of the country above South Carolina, you are probably experiencing some snow today. In southeastern Virginia, we started getting snow yesterday afternoon and through the night. And if there’s anything that below freezing temperatures and a few inches of snow makes you want, it’s soup. A certain soup company has made like a zillion dollar or something on this concept. Ehhh?

Please don't sue me for the unauthorized use of this picture, soup company!

Please don’t sue me for the unauthorized use of this picture, soup company!

So last night I got the soup pot fired up, but unlike this creepy snowman kid, I did not turn to the standard snow day soup . . .

Move over, Chicken Noodle – there’s a new soup in town!

Ham & Cabbage Soup

ham and cabbage soup

Ingredients:

  • 6 cups of chicken broth (I used my homemade crockpot chicken broth)
  • 1 onion, diced
  • 5-6 medium carrots, diced
  • 1 small head of cabbage, chopped
  • 1/2 cup of pearled barley
  • 1/2 – 1 lb ham, diced
  • 1 tsp garlic powder
  • 1 tbs dried parsley
  • salt and pepper to taste

Method:

  1. Add all the ingredients to a large, heavy stockpot, bring it to a boil, then reduce to low and simmer for 1.5 hours. Soup is ready when carrots and cabbage are tender and barley has fluffed and cooked through.

A quick note about the ham. You can use any kind of ham you want here – I made this soup because I had a little less than a pound of Honeybaked Ham (on the bone) left over from a brunch. I usually make this soup with a salted, country style ham to give the soup the saltiness I like. But if you prefer sweet ham and don’t need or want your soup to be salty, then use that. Another note that the cabbage, carrots and onions came from our Winter CSA that we are getting from Cullipher Farm. Yes, there is fresh, local produce available in the winter! In addition to those ingredients we also got potatoes, kale, turnips and collards in our box last week.

This soup is very filling thanks to the barley. Barley is a whole grain that is high in fiber, which means it helps with digestion, can lower cholesterol, keep blood pressure low and reduce the risk of type 2 diabetes. Barley is more effective at all of these things than whole oats, so it’s a good substitute every once in awhile. For those with diabetes, pearled barley has the lowest glycemic index of all the common cereal grains (such as wheat, rye, oats, etc). This means that even though it is a carbohydrate, it won’t raise your blood sugar as much as other carbs. It’s glycemic index (when boiled) is 35.

Additionally, carrots, cabbage and onions provide a wide variety of nutrients from Vitamins K and C to powerful antioxidants that protect our bodies against a host of things, including cancer. So while chicken noodle soup might ward off a cold, this soup is fighting cancer. And with high fiber barley rather than high-glycemic noodles, to boot. So make a bowl and sit back and enjoy the snow.

The Drunken Clam

What is this? A second post this week?? I maintain that you shouldn’t get your hopes up, but for now – here’s some food.

The Drunken Clam

clams

Ingredients:

  • 2 tbs butter (or Vegan butter, which is what I use and works great)
  • 1 tbs olive oil
  • one large shallot, chopped
  • two large garlic gloves, chopped fine
  • one large heirloom tomato, diced
  • 1/2 – 1 cup white wine (I suggest Pinot Grigio)
  • fresh lemon
  • one bag of Littleneck clams – usually around 50 or so clams – scrubbed and rinsed well
  • handful of parsley, chopped

Method:

  1. Heat the olive oil and butter in a large skillet with a lid over medium heat. Once the butter begins to bubble, add the garlic and shallot and saute 2-3 minutes until shallot starts to become translucent, then add in the diced tomatoes, salt and pepper to taste and stir for two more minutes.
  2. Pour in the wine, stir to combine, and bring to a light boil, then reduce heat back to medium and add the clams and the juice of half a lemon, and stir gently to incorporate the sauce, then put the lid on the skillet and let sit for 7-8 minutes.
  3. Take the lid off, pour in a little bit more wine and a tablespoon more butter, a squeeze of a lemon wedge as well as the parsley. Stir to combine, then with a slotted spoon, divide the clams between the bowls then pour the remaining sauce in the pan over each of the bowls of clams.
  4. Serve with hot, toasted French bread, a lemon wedge and the rest of that Pinot Grigio. This serves four normal people or two of us.

The Littleneck clams I purchased were from Cherrystone Aqua Farms which farms and harvests clams and oysters on the Eastern Shore of Virginia. Yes, Cherrystone is also a type of clam, but did you know Littlenecks and Cherrystone clams are the same clams? These as well as Topnecks are all just Quahogs – their different names simply refer to their size, with Littlenecks being the smallest, then Cherrystones , then Topnecks are big boys and the clams that are just called Quahogs are the largest. Smaller clams will do better in this recipe as the larger a clam gets, the tougher it gets. Quick steams with light sauces like this are best done with young, tender clams. Chowders and stuffed clams can be done with your Topnecks and Quahogs. So you see – bigger is not always better.

Clams are low in fat and high in protein and they offer higher than average amounts of necessary minerals like selenium, zinc, iron and magnesium as well as B vitamins and niacin. They’re also painfully easy to make, as you can see from above. People get freaked out by seafood and even more freaked out by bivalves. There’s really nothing to be afraid of, but there are some things you need to make sure of when dealing with clams and other bivalves such as mussels or oysters:

  • Buy them fresh from a reputable fish monger or seafood market
  • Keep them cold until you cook them (in a bowl of ice in the fridge is best)
  • Rinse them well before cooking – they dig around in the dirt for a living….
  • Once you have cooked them, check for shells that did not open. Any shells that didn’t open during cooking should be disposed of as this is indicative that the clam may have been dead prior to cooking and therefore not of the freshest variety. If you got a batch where several clams didn’t open, that means they weren’t fresh and you might want to purchase from a different seafood market next time. Having one or two that don’t open, though, is pretty normal.

So don’t freak out. Just split a bottle of wine with those clams and relax.

Back with the Beets

Hey, so it’s been awhile. And I apologize. But I’m not going to pretend like it’s a new year and I’m going to be better about blogging and make resolutions or promises about this, because then we would both be disappointed. See, around May of 2014 I turned my freelance career into an actual business: The Content Chop Shop. And since then I have been overwhelmed and overjoyed by the amount of business I’ve had. Quite a bit of this business is blogging….for other companies. This leaves very little time for blogging….for myself.

But this past Christmas I was gifted a new kitchen appliance . . . one that, unlike the uninspired toaster or a microwave, has basically spawned a cult of loyal followers. That’s right – someone gave me a juicer.

Breville Brothers. AKA - the gateway between me and 90% of my food.

Breville Brothers. AKA – the gateway between me and 90% of my food.

Why Juice?

I’m not going to go into a long, scientific, Alton Brown-esque explanation here like I usually do, but here’s the gist of it:

It’s hard to eat a bunch of fruits and veggies. It’s much easier to just drink them and get the same nutrients in one glass of juice than five or six whole foods. 

Yes, ideally I would eat two apples, three carrots, a nub of ginger, half a kohlrabi, a pear and a handful of parsley, but I’m not going to, so instead I juiced them all and had that for lunch. Simple. I like simple.

I’ve only been juicing for a couple of weeks, but so far I love it! I have so much energy when I do and the juices are really so much more filling that you would think. I really did have that juice I just mentioned for lunch today and it kept me satiated until 5:30 when I had a handful of pistachios while getting dinner ready.

But as you can imagine, it didn’t take me long to incorporate my all-time favorite food into my new juicing obsession: beets.

Blood-Red Beet Juice Martini

beet juice

Ingredients:

  • 2 honeycrisp apples
  • one raw beet, scrubbed and trimmed
  • four medium carrots, scrubbed
  • handful of baby kale

Method:

  1. When/if possible, choose all organic ingredients listed above. Wash and trim any greens from carrots and beets
  2. Process all ingredients through your juicer
  3. Pour juice into a martini shaker full of ice and shake for several seconds
  4. pour into chilled martini glasses and enjoy!

So why the martini shaker? 

Because it’s cool. I mean, really – when juice comes out of a juicer it’s basically just room temperature, so if you like your juice a little chilled, shaking it in a martini shaker is actually a kind of brilliant way (if I do say so myself) to bring its temperature down without diluting it too much by pouring it over ice. This juice was just a bit sweet from the apples and beets with a nice earthiness from the carrots and kale. It was a really good balance and when sipped during dinner, kept my appetite at bay, meaning it kept me from over eating, which is a common problem for me . . .

So while I can’t commit to blogging on a regular basis, I can commit to juicing. Because it’s easy, it’s good for you, and the other people in my cult tell me it’s cool.

Summer Recipe Roundup

A few weeks ago, a friend of mine asked if I could post some fun, summer recipes. The problem is that because summer has just begun (or not even, officially), I can’t really start experimenting or playing around with summer recipes yet until the produce is available. I did get a pretty good haul this past weekend and hopefully will have some recipes to share with you at the end of the week, but for now, what I thought might be nice is to round up several recipes from previous summers, with links, so you can dive into the archives and go with something tried and true. So here ya go, Janessa.

Summer Recipe Roundup

Creamy Avocado Linguine with Meyer Lemon and Arugula
shrimp avocado pasta

Although avocados are technically in season all the time, this dish is decidedly summer. The addition of shrimp make it seasonal for the Eastern Seaboard, and it’s just so damn refreshing.


Dried Strawberries

Dried Strawberries

There are still some strawberries in the fields around here – if they’re still available where you are, a great way to save them is to dry and freeze them. Great on salads, in cereal, oatmeal, yogurt, etc.

Eggplant Rotini with Roasted Veggies

eggplant Rotini

This is one of my favorite summer recipes. Quick, fresh, easy and adaptable to whatever veggies you have on hand. Don’t go through the summer without making this.

Local Yokel Mojito
20130415-183149.jpg

Of course I had to add a beverage in, but mojitos, with fresh mint from your garden, are the epitome of summer sipping. My mint is already coming up like crazy, and if yours is too, then don’t let another Happy Hour go by without making this.

Roasted Beet Salad with Vinaigrette
Beets in vinaigrette

I just got a bunch of beets from the farmers market this past weekend, so beet salad with vinaigrette is not far away. This is by far my favorite beet recipe out there and a summer staple at our house.

Shrimp Ceviche
20130316-202832.jpg

Shrimp Ceviche is so fresh, light and healthy that it screams summer. Dish it out into martini glasses for a classy, but super easy app.

Summer Beef and Rice Skillet Casserole
beef skillet

This recipe was great and I’m furious at myself for not making it this past summer between our epic move and living in two different states. This is a great way to use up all that squash and zucchini that presents itself mid to late summer. It’s also great for a family or for a small crowd. This summer, I’ll be making it as much as is reasonable and/or until my husband starts complaining.


OK! There are so many more recipes, many of which are summer seasonable, over on the RECIPES PAGE, but hopefully this gave you a good start. This is such an exciting time of year when things start to pop up and the options are endless, so don’t let it pass you by – get out to your local farmers market, farm stand or local grocery and BUY LOCAL and EAT FRESH!

Frittata. Yo momma.

Part of the haul from the market yesterday went into this morning’s frittata. Sautéed kale, onions, and tomatoes in a large frying pan, when kale is wilted and tender, drop in some chopped turkey deli meat and pour in four large beaten eggs, top with a handful of shredded mozzarella. Transfer to oven at 350 and bake until egg is set.

20140608-211652-76612460.jpg

Yo momma!

Open Season

For locavores, June marks the beginning of open season. Markets open back up, farm stands are on every corner and fresh produce is back at last. This morning I woke up, threw some clothes on and told the husband to make my coffee to-go and hold off on frying the bacon. Half an hour later we were back home with new potatoes, kale, beets, green beans and fresh baked tomato basil rolls. And all for $15. But eating fresh and local? That’s priceless.

20140607-103632-38192149.jpg

Happy produce hunting, friends!!

Like Father, Like Daughter

My dad makes this outrageous clam chowder that people will literally put in requests for. Sometimes in the winter my mom and dad will host an oyster roast at their house and my dad will steam oysters under a wet towel on the grill outside and we’ll stand around shucking them over plywood laid out on saw horses with big steaming bowls of this chowder. It is really culinary perfection – exactly the way I love to eat and experience food.

The chowder that he makes isn’t thick and creamy like up north, this is what we call “Hatteras Style” clam chowder and it’s really more of a soup than a chowder. It’s brothy, chunky and extremely peppery. For the longest time I assumed it was some sort of complicated recipe that I didn’t want to take on, until one night when I was pining for it, he said nonchalantly,  “all you need is a can of clams and some potatoes.” What?? Seriously??

Anyways, the simplicity of this recipe doesn’t make it any less amazing. Much like me, my dad doesn’t cook to a precise recipe, so these amounts were estimated by me until it looked and tasted similar to his. I will say, just when you think you’ve added enough pepper, add some more.

Bob’s Clam Chowder, Hatteras Style

Hatteras Style Clam Chowder

Ingredients:

  • 3 stalks of celery, diced
  • 1 medium onion, diced
  • 2 tbs butter
  • 4 medium red potatoes, diced
  • 2 small cans of chopped clams or 1 large can (depends on where you go – most grocery stores just carry the small, tuna can sized ones)
  • salt, pepper and parsley to taste

Method:

  1. Melt the butter in a large stock pot and add the onions and celery and saute until soft
  2. Add the potatoes, add salt and pepper and stir well
  3. Add both cans of clams – WITH juice, stir well
  4. Add 3 cups of water (or more depending on how brothy you want it)
  5. Bring to a boil, then down to a simmer for 15 minutes or until potatoes are easily pierced with a fork.
  6. Add more salt and pepper to taste. Serve steaming hot with oyster crackers

Hatteras Style Clam Chowder

This recipe makes about four hearty bowls. Double for more or triple for a crowd. At some stores you’ll be able to find the huge cans of chopped clams, which is probably worthwhile if you’re cooking for a small army.


Bison stuffed cabbage

Stuffed cabbage was not a part of my childhood growing up – it’s something I sometimes heard other people talk about or maybe even tried once or twice, but it wasn’t until I married my half-Polish husband and had “Galumpkis” at his family’s house in Ohio that I realized what I’d been missing out on. A few years ago I made the traditional Polish Galumpkis recipe and swore I’d never take it on again – it was a three page long recipe that downright exhausted me. But I found myself with an abundance of cabbage recently and decided to give it a go again in my own simplified version and with bison rather than ground beef or pork.

Pastured bison (which is really the only kind of bison you can buy) is leaner and healthier than beef or pork. Pastured animals are free-range, they eat grass and graze on open pasture, which means they move around, develop healthy muscles and fat and because they’re eating what nature intended for them to eat (instead of corn and antibiotics like mass produced beef), their meat is actually healthier and contains WAY more Omega-3’s and less bad (saturated) fats.

I also substituted quinoa for rice. We generally don’t eat rice – I don’t really like it unless there’s raw fish on top of it and there’s just not a lot of nutritional value. Quinoa is a whole grain with a higher fiber content and other nutritional benefits like a particularly high dose of antioxidant phytonutrients…..and other scientific sounding things that I will refrain from diving into.

And cabbage is good for you. Obviously. If it wasn’t, nobody would eat it.

Bison and Quinoa Stuffed Cabbage

rolls

Ingredients:

  • 1 lb ground bison
  • 1/2 a medium onion, chopped
  • 1 can stewed tomatoes, roughly chopped with juice
  • 1/3 cup water
  • 1/3 cup quinoa
  • 1/2 tsp oregano (dried)
  • 8 medium to large cabbage leaves
  • 1 15oz can of tomato sauce
  • 1 tsp maple syrup
  • 1/2 tsp oregano
  • 1/8 tsp cinnamon
  • Parmesan, shredded Swiss or Jack cheese (optional)

Method:

  1. In a large skillet, brown the meat and cook the onions – drain off any fat (there won’t be a lot – remember, this is a very lean meat), then stir in the tomatoes with their juice, the water, quinoa, 1/2 tsp oregano, and 1/4 tsp ground black pepper. Bring this up to a boil, then reduce, cover and let simmer about 20 minutes, until the quinoa is cooked (when quinoa is done, the grain sort of “pops” open).
  2. Meanwhile, trim the large veins from the back of the cabbage leaves so they rib is flush with the leaf. Use a small paring knife to do this. Drop the leaves, three or four at a time into a bot of boiling water for just 2-3 minutes or until they are just limp – then quickly drop into a bowl of ice water as you continue with the others. This is “blanching” and it retains texture and color:

    blanched cabbage

    Blanched Cabbage

  3. After all the leaves have been blanched, pull them out of the water and dry them off with a towel. Scoop about 1/3 cup of the meat mixture into the center of the leaf, fold in the sides of the leaf, then start rolling at one of the unfolded ends until its all rolled up nice and neatly and no meat is exposed. Do this to all of the leaves and set to the side.
  4. To make the sauce, combine the tomato sauce, maple syrup*, oregano, cinnamon and salt and pepper to taste in a small mixing bowl. Pour half of the sauce into a 2-quart baking dish. Arrange stuffed leaves on top, then pour the remaining sauce over the rolls. Cover the baking dish and bake at 350 for 35-40 minutes. If you want cheese on top (I did a tiny bit of shredded Jack – it honestly made no difference), then top with cheese and bake for a few more minutes until melted, then remove from oven and serve!

rolls with fork

*I use a Virginia made maple syrup that is, without exaggeration, the best maple syrup in the world. It is made by two very special people, Pat and Valerie. If you can’t name the people making your syrup, then get on it (and Aunt Jemima doesn’t count). Now you can. You can purchase it through their Back Creek Farms website – they even did the work for me and tell you all about why maple syrup is actually good for you! While you’re there – check out their adorable cabin, which I have stayed in and can vouch for the fact that it’s one of the most adorable places on the planet.

maple syrup